Device Addition - Example Explained
This script guides the reader through the implementation of one of the device files in flowchem.
To better understand how the package works, let’s select a device consisiting of multiple components: the ML600.
The ML600 is a syringe pump developed by Hamilton Company.
There are two models of these pumps, one with a single channel and one with two channels, as shown in the figure above:
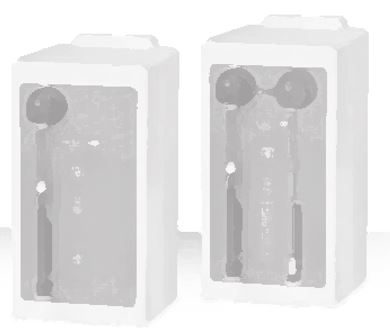
As we can see, one channel consists of a valve connected to the outlet of the syringe. It means that this device has more than one component, i.e, valve and pump.
Let’s start with the basics, as we learned in add_new_device.
First, we will create the script where the ML600’s device class will be written. Let’s call it ml600.py:
from flowchem.components.device_info import DeviceInfo
from flowchem.devices.flowchem_device import FlowchemDevice
from flowchem.devices.hamilton.ml600_pump import ML600Pump              # Component - Pump
from flowchem.devices.hamilton.ml600_valve import ML600LeftValve        # Component - Valve


class ML600(FlowchemDevice):

    def __init__(
        self,
        name: str,
    ) -> None:

        super().__init__(name)

        self.device_info = DeviceInfo(
            manufacturer="Hamilton",
            model="ML600",
        )

    async def initialize(self):
        """Initialize pump and its components."""

        self.components.extend([ML600Pump("pump", self), ML600LeftValve("valve", self)])
We will write a new module in the same folder with the classes for each component. The pump component, for
example, we have the ml600_pump.py.
from flowchem.components.pumps.syringe_pump import SyringePump
from typing import TYPE_CHECKING
if TYPE_CHECKING:
    from .ml600 import ML600

class ML600Pump(SyringePump):

    pump_code: str
    hw_device: ML600  # for typing's sake

    def __init__(self, name: str, hw_device: ML600, pump_code: str = "") -> None:

        super().__init__(name, hw_device)

    @staticmethod
    def is_withdrawing_capable() -> bool:
        """
        Indicate that the ML600 pump can perform withdrawal operations.
        """
        return True

    async def is_pumping(self) -> bool:
        """
        Check if the pump is currently moving.

        Returns:
        --------
        bool
            True if the pump is moving or has commands in buffer, False if it's idle.
        """
        ...

    async def stop(self) -> bool:
        """
        Stop the pump's operation.

        Returns:
        --------
        bool
            True if the pump successfully stops, False otherwise.
        """
        ...

    async def infuse(self, rate: str = "", volume: str = "") -> bool:
        """
        Start an infusion with the given rate and volume.
        """
        ...

    async def withdraw(self, rate: str = "1 ml/min", volume: str | None = None) -> bool:
        """
        Start a withdrawal with the given rate and volume.
        """
        ...
Observe that the pump component of the device is a syringe pump, which means that we can inherit the functionality of the SyringePump class. We just need to overwrite the methods according to our specific connectivity commands from the device.
We now have two modules to work on: ml600.py and ml600_pump.py. We will start by focusing on the less complicated
module, ml600_pump.py. To avoid overwhelming the reader, we will choose a specific functionality of the device and follow how
the data is carried out through the modules. For example, let’s focus on a specific function is_pumping.
Component Module ml600_pump.py
It is good practice to handle communication with the device in the main class ML600, where the connectivity is established. This means that the methods in our component class should only call methods in the main class where the actual connectivity is set up.
...
from flowchem import ureg
...
class ML600Pump(SyringePump):
    def __init__(self, name: str, hw_device: ML600, pump_code: str = "") -> None:
        super().__init__(name, hw_device)
        self.pump_code = pump_code

    async def is_pumping(self) -> bool:
        """ ... """
        return await self.hw_device.get_pump_status(self.pump_code)

    ...
Note
The pump_code attribute is specific for the kinf of pump it is. Default is “”, which denotes a single syringe.
B or C for dual syringe pump.
The communication with the device happens inside the methods. In our example this happens through get_pump_status,
of the hw_device. Remember that the hw_device is the ML600 main class. Another important point is that this method
is overriding a parent method present in the SyringePump, which already has an API router to access this endpoint in
the API server. This means that it is not necessary to add a new API router for this method.
Main module ml600.py
Now, let’s come back to our main module ml600.py. With a careful look at the device
manual we will see how the commands should be written and
sent through the serial. Based on this, we can write a data class to help us manage it all.
import string
...
PUMP_ADDRESS = dict(enumerate(string.ascii_lowercase[:16], start=1))
...
@dataclass
class Protocol1Command:
    """Class representing a pump command and its expected reply."""

    command: str
    target_pump_num: int = 1
    target_component: str = ""
    command_value: str = ""
    optional_parameter: str = ""
    parameter_value: str = ""
    execution_command: str = "R"  # Execute

    def compile(self) -> str:
        """Create actual command byte by prepending pump address to command and appending executing command."""
        compiled_command = (
            f"{PUMP_ADDRESS[self.target_pump_num]}"
            f"{self.target_component}"
            f"{self.command}{self.command_value}"
        )

        if self.parameter_value:
            compiled_command += f"{self.optional_parameter}{self.parameter_value}"

        return compiled_command + self.execution_command
The commands can be grouped in an Enum, effectively managing the commands sent to the device. As there are many
commands available for this device, we will focus only on the necessary ones to trigger our command is_pumping.
...
class ML600Commands(Enum):
    """ Just a collection of commands. Grouped here to ease future, unlikely, changes. """
    ...
    # STATUS REQUEST
    ...
    # STATUS REQUEST  - these have complex responses, see relevant methods for details.
    ...
    BUSY_STATUS = "T1"
    ...
According to the manual, to verify if the pump is busy, we only need to send the command aT1 and wait for the reply.
Based on the two classes written above, the command can be better explained according to the description below.
a - It is the pump address;
T1 - It is the command sent to the pump return its status (Busy or not).
And finally, a class to setup up the serial connection, which can control a series of devices
through the same port. This HamiltonPumpIO class serves as a low-level interface for communicating with
a Hamilton pump over a serial connection using the aioserial library for asynchronous I/O operations.
We want to focus solely on the is_pumping functionality, so we will explore the methods through which
the command passes.
class HamiltonPumpIO:
    ...
    async def _write_async(self, command: bytes):
        """Write a command to the pump."""
        await self._serial.write_async(command)

    async def _read_reply_async(self) -> str:
        """Read the pump reply from serial communication."""
        reply_string = await self._serial.readline_async()
        return reply_string.decode("ascii")

    async def write_and_read_reply_async(self, command: Protocol1Command) -> str:
        """Send a command to the pump, read the replies and returns it, optionally parsed."""
        self._serial.reset_input_buffer()
        await self._write_async(f"{command.compile()}\r".encode("ascii"))
        response = await self._read_reply_async()

        return self._parse_response(response)
The methods writen in the component class to access the functionality of the device are built in the main class of
the device ML600:
class ML600(FlowchemDevice):
    ...
    async def send_command_and_read_reply(self, command: Protocol1Command) -> str:
        """Send a command to the pump. Here we just add the right pump number."""
        command.target_pump_num = self.address
        return await self.pump_io.write_and_read_reply_async(command)

    async def get_pump_status(self, pump: str = "") -> bool:
        """Ture means pump is busy. False means pump is idle."""
        checking_mapping = {"B": 1, "C": 3}
        pump = "B" if not pump else pump
        status = await self.system_status(checking_mapping[pump])
        logger.info(f"pump {pump} is busy: {status}")
        return status

    async def system_status(self, component: int = -1) -> bool | dict[str: bool]:
        """
        Represent the status of specific component. True means busy; False meaens idle.
        Return status of all parts of instrument in dictionary.
        """
        reply = await self.send_command_and_read_reply(
                Protocol1Command(command="T1", execution_command=""))
        all_status = ''.join(format(byte, '08b') for byte in reply.encode('ascii'))[::-1]
        # 1 is true and 0 is false according to the manual; but the real signal is opposite.
        if -1 < component < 5:
            return all_status[component] == "0"

        value_map = {0: "left_valve busy", 1: "left_pump busy",
                     2: "right_valve busy", 3: "right_pump busy",
                     4: "step_active busy", 5: "handprobe_active busy"}
        status = {}
        for key in value_map:
            logger.debug(f"{value_map[key]} : {all_status[key] == '0'}")
            status[value_map[key]] = all_status[key] == "0"
        return status

    ...
Therefore, the data flux can be visualized in the flowchart below when the command ‘is_pumping’ is triggered.

The command status indicator is triggered to verify if the pump is pumping, and the endpoint ‘is_pumping’ is activated.
This triggers the command get_pump_status, which is then translated based on the basic commands in the
Protocol1Command class. This command, translated to aT1, is sent to HamiltoPumpIO, which is responsible for
handling the actual communication with the pump via USB. The reply follows the same flow but in the opposite direction.
In this case, it indicates that the pump is idle. In summary, this figure illustrates how a system manages pump
operations through a series of command executions and status checks,
utilizing asynchronous communication over USB.
Outlook
The example presented above demonstrates the implementation of a real device in flowchem. It’s important to note that this explanation has focused on just one of the device’s many features. We chose this approach because providing all of the ML600’s features in this document would overwhelm the reader. The main points to consider when implementing a device are:
All devices must be composed of components.
Components must inherit the functionality of component classes already implemented in flowchem.
Communication should be carried out in the device’s main class, with the component class simply directing commands to it. Note that the component methods will be available on the API server.
The main class must have an initialization method, which will be triggered when the server is being built. In this method, the device must be initialized and inspected to ensure that the functionalities provided in the API are working.
The construction of the component’s main class is determined by the constructor. Our aim is to use Python functions as auxiliary classes to enhance understanding, simplicity, maintainability, and ease of inspecting possible errors. The example illustrated in this ML600 document serves as an example of good code structuring when the device is highly complex.
Reference
The code for implementing the ml600 is provided here.